Cluster Details & Setup
Ellf lets you plug in your own data processing cluster hosted locally or on your cloud infrastructure and under your control. The cluster provides all data, models and custom code you use and create, and serves the annotation interface and performs actions like model training or data analysis. This means that no sensitive data ever leaves your servers or has to pass through our servers in the process. See the architecture docs for an overview of which data is stored where.
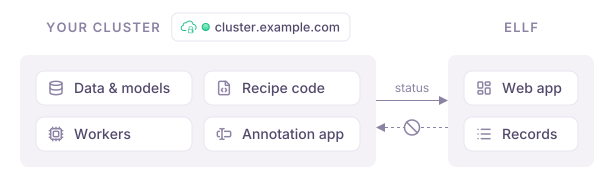
The infra and clusters CLI lets you set up and launch your own cluster without requiring deep infrastructure or DevOps expertise. It also lets you manage your cluster and check its status. In the UI, clicking ClusterSetup will show details and configuration options. In the top bar of the app, you will also see the cluster status.
Installation
Under the hood, the cluster uses Kubernetes and can be installed to run locally on your machine or another machine on your network, or in the cloud under your own cloud provider like AWS, GCP or Azure. If you prefer to use a cluster hosted by us on our infrastructure, get in touch!
Localall plans
Install the cluster on your local machine or network
Cloudteam plans
Install the cluster on Google Cloud, AWS or Azure
Custom Terraform
Integrate cluster into existing infrastructure setup
Installing the cluster locally
Use Ellf to set up the cluster for you
If you’ve connected Ellf to your coding assistant, it will be able to set up your local cluster for you. This is also helpful if you’re running into any issues unrelated to Ellf.
Setting up the cluster on a machine you control is the quickest and easiest option to get started. Under the hood, it uses K3s, a lightweight Kubernetes distribution. You can run it on the computer you work on, or on another machine on your network, like a workstation or home server, and use Ellf from any of your devices on that network.
On the free Solo plan, your cluster runs on your own machine or a machine on your home network, and registering it without --domain sets it up on http://localhost automatically. To run your cluster in the cloud and unlock team collaboration, subscribe to a team plan.
The address you register the cluster at decides where you can use Ellf from and whether the cluster needs a certificate:
| Address | Where to use it | Certificate |
|---|---|---|
http://localhost | A cluster on the computer you use Ellf on. The default on the Solo plan. Doesn’t work in Safari. | None needed: browsers treat localhost as a secure context. |
https://localhost | A cluster on the computer you use Ellf on, in any browser including Safari. | Issued by Ellf, trusted once on this computer. |
https://192.168.1.20 (the machine’s IP) | A cluster on another machine on your private network, reachable from all your devices on it. | Issued by Ellf, trusted once on each device. |
No public certificate authority like Let’s Encrypt can certify localhost or a private IP address, so Ellf issues the certificate for a cluster served over HTTPS at one. Each cluster gets its own certificate authority, limited to the cluster’s own address, so trusting it can’t let it vouch for any other site. The cluster generates its private key itself and only sends Ellf a signing request, so the key never leaves the cluster. The cluster also renews the certificate automatically before it expires.
Prerequisites
The machine the cluster runs on only needs K3s. The Ellf CLI, kubectl and Helm run on the computer you set the cluster up from, which can be the same machine or another computer on the network.
- a Linux machine (bare metal or VM) with at least 4 GB RAM and 20 GB disk for the cluster, with K3s installed:
$ curl -sfL https://get.k3s.io | sh - kubectland Helm installed on the computer you set the cluster up from (K3s already comes withkubectl):$ curl -fsSL https://raw.githubusercontent.com/helm/helm/main/scripts/get-helm-3 | bash- the Ellf CLI installed and authenticated on the same computer
K3s writes its kubeconfig to /etc/rancher/k3s/k3s.yaml, readable only by root. If you set the cluster up on the same machine, copy it to your user’s kubeconfig:
$ mkdir -p ~/.kube
$ sudo cp /etc/rancher/k3s/k3s.yaml ~/.kube/config
$ sudo chown $USER ~/.kube/config
If your system defaults to the K3s kubeconfig path instead of ~/.kube/config, set the KUBECONFIG variable in your shell profile:
$ export KUBECONFIG=~/.kube/configIf you set the cluster up from another computer, copy the kubeconfig over and point it at the machine’s address on your network. The kubeconfig names the API server as 127.0.0.1, and K3s’s API certificate already covers the machine’s own IP, so changing the address is all it takes. Port 6443 on the cluster machine needs to be reachable from your computer, and port 443 from every device you use Ellf on.
$ mkdir -p ~/.kube
$ ssh -t you@192.168.1.20 'sudo cat /etc/rancher/k3s/k3s.yaml' | tr -d '\r' | sed 's#https://127.0.0.1:6443#https://192.168.1.20:6443#' > ~/.kube/ellf-cluster.yaml
$ chmod 600 ~/.kube/ellf-cluster.yaml
$ export KUBECONFIG=~/.kube/ellf-cluster.yaml
The kubeconfig contains the cluster’s admin key, so keep it private and out of version control. Verify that kubectl can reach the cluster:
$kubectl get nodes✔ your-machine Ready control-plane …Register, configure and deploy
Next, you can use the infra CLI to register your cluster with Ellf, with k3s as the cloud provider and the address you’ve chosen as the domain. For a cluster on the computer you use Ellf on, that’s http://localhost:
$ellfinfra
init
--name my-cluster--domain http://localhost--cloud-provider k3sFor a cluster on another machine on your network, use https and the machine’s IP address on your network:
$ellfinfra
init
--name my-cluster--domain https://192.168.1.20--cloud-provider k3sThis registers the cluster and prints the next steps for its address. It writes no credentials to your machine. K3s ships with Traefik pre-installed, and the certificate for an https cluster comes from Ellf, so there’s no further infrastructure to install. Generate the Helm values file for the registered cluster:
$ellfinfra
init-values
--cluster my-cluster--cloud-provider k3sThe address comes from the registration, and for an https cluster, the values turn on the certificate from Ellf. The generated values.yaml holds no secrets, so you can keep it with the rest of your configuration: deploy hands the cluster its registry and license keys from Ellf, and creates a database password that stays in the cluster. Next, deploy the cluster:
With --wait, the deploy waits until the cluster’s services are ready and, for an https cluster, until it has received its first certificate from Ellf.
If you’d rather reach a cluster on your network at a hostname that your own DNS points at the machine, Ellf can’t issue it a certificate. Instead, bring your own as a kubernetes.io/tls secret in the cluster’s ellf namespace, made however you like, for example from your company’s certificate authority or your own cert-manager issuer, and pass its name to init-values:
$ kubectl create namespace ellf
$ kubectl -n ellf create secret tls ellf-tls --cert=certificate.pem --key=key.pem
$ ellf infra init-values --cluster my-cluster --cloud-provider k3s --tls-secret-name ellf-tls
If the hostname resolves to a public IP address that’s reachable from the internet, Let’s Encrypt can issue the certificate instead: run setup --cert-manager and pass --acme-email to init-values. init prints the right steps for the address you registered.
Trusting the cluster’s certificate
A cluster served over https with a certificate from Ellf needs each device you use Ellf on to trust its certificate authority once. Until then, check reports that this device doesn’t trust the cluster’s certificate, and list shows its status as untrusted_certificate.
This fetches the cluster’s certificate authority from Ellf and prints the commands to trust it on this device: in the login keychain on macOS, the current user’s certificate store on Windows, and the system store as well as Chrome’s and Firefox’s certificate databases on Linux. Run them, then reload Ellf in your browser.
It only needs your Ellf login, not kubectl, so you can run it on any computer you open Ellf on. On a phone or tablet, the cluster page in the app offers a download of the certificate authority to install. On iPhone and iPad, also turn on full trust for it under SettingsGeneralAboutCertificate Trust Settings.
Checking the cluster
Once the deployment completes, verify the cluster is healthy:
$ellfclusters
check
✔ Cluster API responding on https://192.168.1.20
✔ Cluster healthy (K8s API accessible from cluster) (Ready)Your cluster is now live and connected to Ellf – you’ll see it in the top bar of the app.
Chrome and Edge ask before a public website like Ellf may connect to devices on your local network, including a cluster on localhost, and you’ll need to accept it:
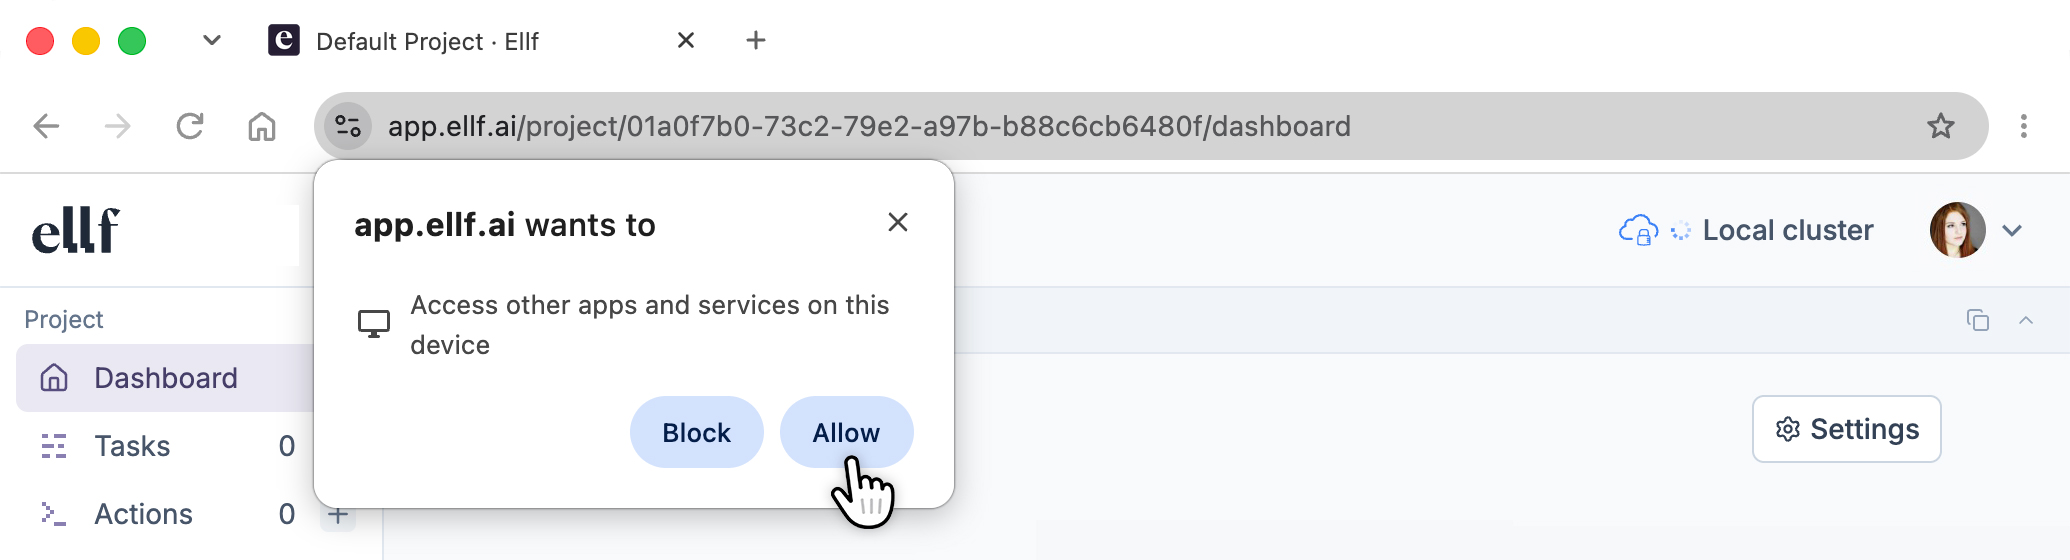
If you’ve accidentally blocked your browser’s request to connect to the cluster on your local network, every request to the cluster fails and the app shows the cluster as disconnected, even though clusters check reports it healthy.
To fix this, click the icon to the left of the address bar, open Site settings, set “Local network access” to “Allow” and reload the page.
The easiest way to remove your cluster from the machine is to tell your coding assistant to do it for you. To remove it manually, uninstall the Helm release and delete its namespace, then remove the cluster’s record from Ellf with clusters delete:
$ helm uninstall ellf --namespace ellf --wait
$ kubectl delete namespace ellf
$ kubectl label node --all ellf/node-class- ellf/role-
$ ellf clusters delete my-cluster
Deleting the namespace also deletes the cluster’s database, including its annotations and datasets. Files you’ve uploaded to the cluster stay on the cluster machine in /srv/prodigy-data – to delete them as well, remove that directory on the cluster machine. K3s itself stays installed – to remove it as well, run /usr/local/bin/k3s-uninstall.sh on the cluster machine.
Installing the cluster in the cloud Starter & Professional plan
Use Ellf to set up the cluster for you
If you’ve connected Ellf to your coding assistant, it will be able to set up your cluster for you and help with infrastructure and cloud provider configuration or issues you might encounter.
For a flexible, stable and production-ready workflow, you typically want to host the cluster in the cloud and share it across your organization. Setup is three commands – init, provision and start – and everything in between (registration, domain allocation, the cluster config, copying Terraform outputs around) is handled for you. If you have an existing infrastructure pipeline or want to hand over the installation to your infrastructure team, see the notes on using your own Terraform pipeline.
Prerequisites
- access to a project in your cloud provider account, with permission to create resources
- an authenticated cloud CLI:
gcloudfor GCP,awsfor AWS,azfor Azure - Terraform,
kubectland Helm installed - the Ellf CLI installed and authenticated
1. Initialize
Pick an empty directory for your cluster files and run infra init. Anything you omit is asked for interactively, including a Terraform state bucket, which you should accept.
This registers the cluster with Ellf, automatically assigns it a subdomain of our domain ellf.run (e.g. yourorg.ellf.run, or you can use your own domain), downloads the Terraform files and generates config.yaml. It’s safe to re-run at any time.
📂 my-cluster
├─ 📄 config.yaml                 # cluster config used by all later steps
├─ 📄 config-aws-example.yaml     # example configs for reference
├─ 📄 config-azure-example.yaml
├─ 📄 config-gcp-example.yaml
└─ 📂 gcp                         # Terraform directory
   ├─ 📄 main.tf
   ├─ 📄 outputs.tf
   ├─ 📄 variables.tf
   ├─ 📄 terraform.tfvars.json    # variables generated from config.yaml
   └─ 📁 modules
Keep your cluster config files around
After the cluster setup, don’t delete the generated cluster config. The config.yaml can later be used to update and manage the cluster, including pausing it via infra pause and infra hibernate. The cluster config files hold no credentials, so you can also commit them to a Git repository.
2. Provision the infrastructure
If your Terraform is applied by an infrastructure team or your own pipeline, skip this step and see the docs on using your own Terraform pipeline.
This shows you the Terraform plan and applies it on confirmation. Everything the infrastructure produces – database address, container registry, ingress IP – is synced into config.yaml automatically, and your cluster’s DNS records are pointed at the new ingress. Expect the apply to take a while (10–20 minutes) on the first run.
3. Enable TLS
For automatic HTTPS certificates via Let’s Encrypt, add your ACME email to config.yaml:
deployment:
  acme_email: you@yourdomain.com
  tls_secret_name: cluster-tls
4. Start the cluster
This fetches kubectl credentials, installs Traefik and cert-manager, and deploys the cluster services. Once it completes, verify the cluster is healthy:
$ellfclusters
check
✔ Cluster API responding on https://yourorg.ellf.run
✔ Cluster healthy (K8s API accessible from cluster) (Ready)Your cluster is now live at its domain and connected to Ellf – you’ll see it in the top bar of the app. To change any setting later (provider inputs, state backend, domain values), edit config.yaml or run infra configure, then re-run provision and/or start to apply.
Terraform state
Terraform tracks everything it created in a state file, and losing it means losing the ability to manage or cleanly destroy the cluster. The CLI therefore requires a state location before it will run Terraform – the versioned bucket that init offers to create is the recommended one, and a Terraform Cloud workspace or an explicit local-state opt-out (terraform: { local: true }, for throwaway clusters) also work.
The bucket deliberately lives outside the Terraform: it must exist before Terraform runs, and infra destroy never touches it, because the destroy itself needs the state it holds. Only delete it manually, after the cluster is gone for good.
Moving an existing cluster to remote state
Record the new backend (infra configure --state-bucket), then run terraform init -migrate-state in the Terraform directory to copy your local state into the bucket – the CLI will stop and tell you to do this if it detects existing local state. Never plan or apply against a freshly created empty backend: the plan would propose recreating the entire cluster.
Using your own Terraform pipeline
If you want to integrate the cluster into your existing infrastructure setup or have your DevOps team take over the installation, you can hand over the directory generated by the initialization step. This bundle includes the config.yaml, the provider Terraform directory and terraform.tfvars.json. Your team can then apply it however you normally apply Terraform, then sync the outputs back instead of running the provision step:
This runs terraform output (remote state works), fills config.yaml and points the DNS, exactly as provision would have. Then continue with starting the cluster.
The AWS module defaults to a single NAT gateway, one t3.medium system node, and a small RDS instance – sized for evaluation, not production load. Review the variables in the downloaded aws/ Terraform files before applying to a shared or production account. Note that AWS IAM is currently scoped at the node level (a shared node role) rather than per-pod via IRSA. On AWS the load balancer address is a hostname, which Ellf’s managed DNS (A records) can’t point at – infra start prints the CNAME records to create in your own DNS instead.
Other cloud providers
Coming soon: Support for other cloud providers is still under development. The cluster infrastructure uses Terraform and Kubernetes under the hood, so it will be possible to set it up on any suitable cloud provider.
Moving project plans to your cluster
When you start using Ellf, your project plans are stored in our database. This allows users to get started with project planning immediately and before setting up and installing their cluster. However, once your cluster is running, you can migrate the project plans.
Coming soon: This feature is still under construction.
System components
Every cluster runs two Ellf system components alongside your tasks, actions, agents and services: the cluster broker, which serves your data and runs your jobs, and the CPL listener, which keeps the Ellf backend informed about the cluster. Both are installed when you set up your cluster and run together in the same deployment.
broker | The cluster’s API server. Requests for data go straight from the web app or CLI to the broker, never through the Ellf backend. It runs your jobs and streams their logs, serves your asset files and datasets, builds your custom recipe packages and manages secrets. |
cpl | The only part of the cluster that connects to the Ellf backend, and it only sends metadata, never your data. It reports job status, registers new recipes and reports annotation counts. It also keeps both components on their target versions. |
By default, the system components update automatically to the latest version with every Ellf release. To view the current versions running on your cluster, see ellf version or navigate to ClusterSetup in the app. To install a specific version, including an older one to roll back to, set it as the target via clusters settings-update. You can see the current targets via clusters settings.
Worker classes
By default, the cluster is set up to provide the workers base, small, medium and gpu, with the following specs. The machine types are specific to what’s available via your cloud provider and can also be customized.
| base | small | medium | gpu | |
|---|---|---|---|---|
| Machine type (GCP) | n2-standard-2 | n2-standard-2 | g1-small | n1-standard-2 |
| Cores per job | 2 | 2 | 2 | 2 |
| Memory per job | 1024 MB | 1024 MB | 1024 MB | 1024 MB |
| Max. memory per job | 4096 MB | 4096 MB | 4096 MB | 4096 MB |
| GPU | null | null | null | nvidia-tesla-t4 |
| Preemptible | false | false | false | false |
Note on preemptible instances
Preemptible VMs are instances that your cloud provider may terminate at any point to reclaim compute, which generally makes them cheaper. However, for workers running annotation tasks, it’s important that the instances used are not preemptible – otherwise, your running tasks may randomly stop and your annotators won’t be able to continue working and in the worst case, you’ll use data and important state.
Pausing and hibernating your cluster
If you’re planning on not using your cluster for a while and want to reduce cloud spend, you can pause it without losing any data. Pausing scales all nodes down to zero and stops the database, while your assets, packages, datasets and annotations stay where they are. Resuming brings the cluster back exactly as it was, and reconnects it to Ellf on its own within a few minutes.
Before pausing, make sure to stop any running tasks, actions, agents and services, or set the --stop-jobs flag to stop them for you. You can then run infra pause and infra resume from the directory containing your cluster’s config.yaml:
While the cluster is paused, your cloud provider still charges for storage, the load balancer and, on GCP and AWS, the Kubernetes control plane. On GCP, you can go one step further and hibernate the cluster via infra hibernate, which deletes the Kubernetes cluster itself but keeps all of its data. Waking it up again with infra wake recreates the cluster around the existing data and takes around 15 to 20 minutes.
Customizing your cluster
Using a custom domain
Because the cluster needs to be available via HTTPS over the internet, it needs to be assigned a domain. When you run infra init (or infra register) without --domain, Ellf allocates it a subdomain of our domain ellf.run, e.g. yourorg.ellf.run, and points its DNS records at the cluster automatically once the ingress address exists. But you can also use your own custom domain or subdomain instead by passing it as --domain:
$ellfinfra
init
--name my-cluster--domain cluster.yourdomain.com--cloud-provider gcpWith your own domain, you manage the DNS: create an A Record pointing your domain or desired subdomain to the cluster’s public IP – on GCP it’s synced into config.yaml as deployment.public_ip by infra provision. Elsewhere infra start prints the load balancer address. The specifics of how and where to do this will depend on your domain registrar or DNS management solution. You don’t need to worry about the SSL certificate and HTTPS – set acme_email in config.yaml and it’s taken care of when you start the cluster.
| yourdomain.com | Record | Example Value | Resulting Cluster Domain |
|---|---|---|---|
@ | A | 34.160.5.141 | yourdomain.com |
cluster | A | 34.160.5.141 | cluster.yourdomain.com |
Using multiple clusters Advanced usage
For most use cases, a single data processing cluster is sufficient and keeps your setup simple. However, for advanced use cases, it’s possible to connect more than one cluster to your Ellf organization. This gives you more control over where and how your data is stored, including using different cloud providers for different data, projects and privacy requirements. It also lets you manage permissions separately, e.g. to give users and developers only access to certain data.
To add a second cluster, run infra init in a separate directory with a different name (and optionally domain). Each cluster gets its own credentials file and configuration:
$ellfinfra
init
--name "Second Cluster"--domain cluster.yourdomain.com--cloud-provider awsAfter successful setup, you should now see a dropdown menu for the cluster status in the top bar, which lets you switch between the available clusters. When you run login on the CLI, you’ll also be prompted to select the cluster to connect to.
ℹ Multiple clusters are available:[1] Main Cluster (yourorg.ellf.run)
[2] Second Cluster (cluster.yourdomain.com)
[3] Local Cluster (http://localhost)
Pick a cluster [1-3]: